Overview
The Raspberry Pi is a popular platform because of its low cost and high integration. In addition to Wi-Fi and Ethernet, this board also has integrated Bluetooth which support BLE. Over the years we’ve seen it used quite often to connect to BLE sensors and other devices.
The Rapsberry Pi’s support for Bluetooth depends on specifically on which Raspberry Pi you have. Here’s a summary of the most popular ones:
| Board | Bluetooth Chipset | Bluetooth Specification Supported |
|---|---|---|
| Raspberry Pi 3 Model A+ | Broadcom BCM43438 | Bluetooth 4.1 |
| Raspberry Pi 3 Model B | Broadcom BCM43438 | Bluetooth 4.1 |
| Raspberry Pi Model 3B+ | Cypress CYW43455 | Bluetooth 4.2 |
| Raspberry Pi 4 Model B | Cypress CYW43455 | Bluetooth 5.0 |
| Raspberry Pi 5 | Cypress CYW43455 | Bluetooth 5.0 |
Raspberry Pi boards support Bluetooth Low Energy because they integrate a combo Wi-Fi + Bluetooth chipset. The exact chipset used varies depending on the board. The Raspberry Pi 3A and B use the BCM43438 chipset from Broadcom, while it changed to a CYW43455 chipset with support for 802.11ac and dual band (2.4GHz and 5GHz) for Raspberry Pi 4 and 5. This chipset supports Bluetooth 5.0 with the mandatory features.
Raspberry Pi BLE Features
One of the challenges with the CYW43455 is that it barely supports Bluetooth 5.0. It only implements the mandatory features of BT5. The 2Mbps PHY is an optional feature, as is the LE Coded PHY. This means that while the system claims support for Bluetooth 5, even the Raspberry Pi 5 itself doesn’t add many of the important features.
It seems that the Raspberry Pi foundation just decided to reuse the Infineon CYW43455 without making any real changes since the Raspberry Pi 3B+. Part of reason is that in order to Qualify the board, the RPI foundation had to use a recent Bluetooth specification and Infineon had updated the CYW43455 to support Bluetooth 5.0.
We’ve gone through the the Raspberry Pi 5 design and here are the BLE features it’s missing:
- LE 2M PHY – Not Supported
- LE Coded PHY – Not Supported
- Stable Modulation Index (TX or RX) – Not Supported
- Link Layer Privacy – Not Supported
- Extended Advertising – Not Supported
- Periodic Advertising – Not Supported
- Multiple Advertising Sets – Not Supported
- Extended Scanner Filter policies – Not Supported
- Extended Scanning – Not Supported
- Scanning for Periodic Advertising – Not Supported
- Channel Selection Algorithm #2 (CSA#2) – Not Supported
As you can tell, it’s missing quite a few features and is more similar to Bluetooth 4.2 with Data length Extension (DLE) than to a Bluetooth 5.0 device. To be fair, features like LE Coded PHY are not normally found on combo Wi-Fi + Bluetooth chipsets. Despite all this, the Raspberry Pi is an extremely popular platforms, and we want you to be able to use it for Bluetooth.
The RPI foundation depends on Infineon for the Bluetooth controller firmware. In order to upgrade the Bluetooth features it would have required updated firmware, or more likely a new chip. Since Infineon still specifies that the CYW43455 is only Bluetooth 5.0 compatible, it likely means there’s no more updates for the device and a new one would need to be used. Recertifying a whole board for a single reason doesn’t make much sense overall.
What to do if you’re looking to use the RPI for BLE and need these features? We recommend using one of the Bluetooth USB dongles available online, especially if they have an external antenna. This would mean you’d need to disable the internal Bluetooth and use the external one, along with our recommendation to not use Wi-Fi on the 2.4GHz band if you can.
Each version of the Raspberry Pi uses Linux and so leverages the Open Source BlueZ Bluetooth stack. This stack has been available for many years, and although it supports both Bluetooth Classic and BLE, its support for BLE is more recent and there are some limitations and sometimes bugs because it does not get as much testing. If you’re thinking of deploying BlueZ, you should most definitively test it extensively in real world applications.
Raspberry Pi BLE Performance
Before we get into running the Raspberry Pi, we wanted to discuss a bit about performance. After all, no guide from us would be complete without it. Over the last few years, we’ve seen companies use the Raspberry Pi as a gateway system because of it’s powerful processor running Linux and cost. We’ve used it in a few projects as well.
The good news are that the Pi has pretty good chipsets from an RF performance, leveraging Broadcom (then Cypress and now Infineon). Some of the boards have support for 5GHz Wi-Fi band, which can help reduce interference on the 2.4GHz band used by BLE.
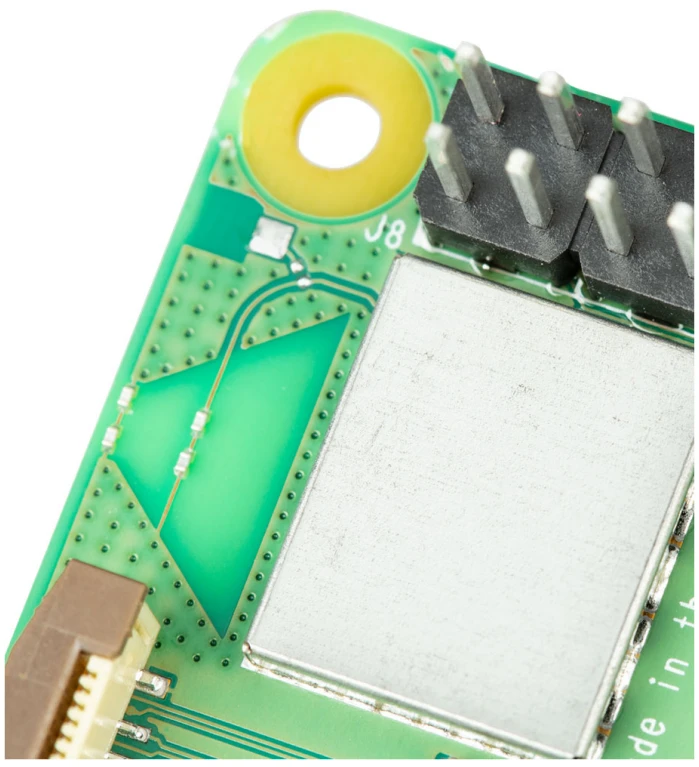
Given that the system is a single chip solution, there is also support for Coexistence to reduce interference. The biggest issue from a performance perspective is that the Raspberry Pi has a relatively small antenna. This antenna is surrounded by the GPIO connector pin connector. Both of these have some impact on performance.
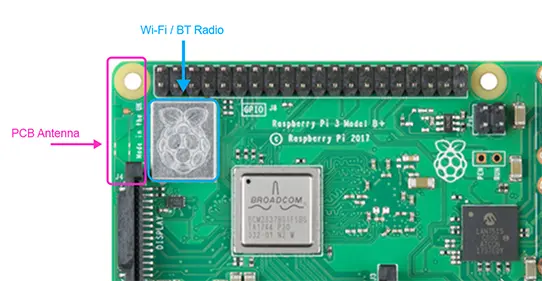
On the left you can see the antenna of the Raspberry Pi 3, while the right shows the antenna of the Raspberry Pi 5. They’re practically identical.
If you look on the board there is actually a trace that would allow a connector for the antenna, but there’s no mechanism to select the antenna, so adding a connector would be an issue.
There’s another reason the antenna can’t be changed on the raspberry Pi: the certification for the Raspberry Pi doesn’t declare an external antenna. Any modification to the board would invalidate the FCC and related certifications.

You can see above the radiation pattern for the Raspberry Pi 5. VP and HP refer to Horizontal Plane and Vertical Plane in the various positions. You can see there there are some significant nulls in certain situations. The small antenna definitely sacrifices some performance.
Additionally, the test reports for the Raspberry Pi 5 indicate an output power of about +5dBm which is average for Bluetooth. So you won’t get a power boost there.
Ultimately, the Bluetooth LE range of the Raspberry Pi devices is decent but limited, and it won’t approach what you can get with an external antenna and a more sophisticated system. If you’re looking to control devices over any reasonable distances beyond a room or two, adding another radio or finding another solution would be best.
With all this said, it can make a good solution for indoor control of devices. Now let’s start using the Raspberry Pi to control some devices.
Requirements
We recommend using a Raspberry Pi 5, but older devices, the Raspberry Pi 4 and 3B+, will work.
We’ll be using a Raspberry Pi 4, but the information will be useful for other Pi boards. To follow along you will need:
- Raspberry Pi 4B (instructions can work for older devices)
- micro SD Card – 8GB or Larger
- micro SD Card Reader
- Power Supply
- Ethernet Cable
- (Optional) USB to UART cable
Preparing the Raspberry Pi 4 for BLE
If you already have a RPi configured, you can skip to Installing BlueZ Bluetooth Stack on the Raspberry Pi
Raspberry Pi runs a custom distribution of Linux. We will be using Raspbian. Download the image file that will be programmed to the SD Card:
Download Raspbian for Raspberry Pi
As of the writing of this guide, the latest release is Raspbian Buster which was released in July 2019.
We recommend using the Torrent approach to download as it is significantly faster. Once downloaded, extract the zip to a folder.
Creating the SD Card

Creating the SD card with Raspbian depends on your platform. For Windows, the easiest approach is as follows:
- Download and Unzip Win32Disk Imager: Win32 Disk Imager Downloads – We recommend Win32DiskImager-1.0.0-binary.zip
- Insert your microSD card into your computer, either using an SD Card adapter or using an external SD Card reader
- Open Win32 Disk Imager by running Win32DiskImager.exe, select the Raspbian img file that was contained in the zip, then select the right drive corresponding to the micro SD card.
After this, click on Write to begin. The write process will begin. How long this takes depends on the SD card and reader performance so we recommend to use good microSD cards with fast writes to avoid waiting too long.
For Linux, we recommend you follow the Installing operating system images on Linux instructions as they depend on a few factors.
Connecting to the Raspberry Pi
Connecting Using Serial
Although there’s a lot of ways to go about controlling the Raspberry Pi, including mouse and keyboard, we tend to use either Serial Port or SSH because the command line is fast.
To get a command prompt on a Raspberry Pi, a USB to UART converter cable needs to be connected to the board. You can readily buy any of these from Mouser, Digikey or many other sources. Here are a few recommendations
- Mouser – TTL-232R-3V3-WE
- Adafruit – FTDI Serial TTL-232 USB Cable
- SparkFun – FTDI Cable 5V VCC-3.3V I/O
All these cables use 3.3V I/O which is the standard voltage of the Raspberry Pi. For these cables, you will need to cut off the ends and connect them properly. In this case, we use the FTDI TTL-232R-3V3-WE cable.

The diagram above shows the 3 pins of the TTL-232R-3V3-WE that must be connected. The colors Black, Yellow and Orange are the colors of the cable wires. You cannot use the 6 pin connector that’s already soldered to some of the cables because the pinout is different. Instead, you will need to cut them and solder some female jumper wires as we show below:

The Raspberry Pi by default has the serial console output disabled. To enable it:
- Insert the SD card into the computer. it should then show two partitions, one of them the boot partition
- Open the file cmdlineargs.txt on the boot partition and insert the following at the end:
enable_uart=1This will allow you to use serial immediately without having to deal with SSH, disconnections, etc. On the other hand, if you want to use SSH, follow the steps in the next section.
Connecting Using SSH
Create a file called SSH in the boot partition. This file should be called “SSH” without the quotes and no extension. On windows, simply Right Click inside the Boot drive folder, select New and then Text Document, renaming it to SSH. When Windows shows a warning for the extension, accept with Yes.

Now that the SD card is ready, make sure to eject it (Windows) or unmount it (Linux/Mac) properly, or else it may not sync.
Insert the SD card into the Raspberry Pi and insert the 5V power supply and an Ethernet cable. The board LEDs should light up.
If you’re using Serial to connect, the Raspberry Pi interface will come up and you can login using the username and password above. If you don’t see any prompt, make sure the pin connections are correct and if needed reverse TX and RX wires.
For SSH, you will need to know the IP address of the Raspberry Pi. Finding it can be a bit of a challenge. One method we use is to use NMAP and scan the network quickly for devices. The Raspberry Pi will show itself and its IP address. You can also login to your router interface and find the MAC address assignments (the RPI will be the last device added).
Control RPI using PuTTY
You will need to use a program such as PuTTY to connect over serial or SSH to the unit. Download PuTTY from the following link:
The link above takes you to the direct 64-bit download. There’s no need to install PuTTY. Open PuTTY, and either
- (SSH) Enter the IP address of the Raspberry Pi you’ve found, then connect.
- (Serial) Enter the COM port of the serial Port assigned to your USB to UART converter using 115200 baud and select Open

To login with the defaults, use the username “pi” and password “raspberry“

A few maintenance tasks
Before we start playing around with BLE on the Raspberry Pi, we need to take care of a few things. first, let’s use the Raspbian configuration utility to expand the file system so we have enough space:
pi@raspberrypi:sudo raspi-configGo to the Advanced Options menu and select Expand Filesystem. Go back and select Finish to save. Afterwards, reboot the raspberry Pi to ensure the configuration is completed:
pi@raspberrypi:sudo rebootYou will need to re-connect if you are using SSH. The quickest way to do this is right click on PuTTY interface and select “Restart Session”.
Installing BlueZ Bluetooth Stack on the Raspberry Pi
Now that our Raspberry Pi is ready, it’s time to get BlueZ on it. as we mentioned before, BlueZ is the Open Source Bluetooth stack. The Raspberry Pi Foundation has already taken care of doing the low level configuration for the Wi-Fi / Bluetooth chipset. If this were a custom hardware platform (as we’ve worked with in the past), you would need to properly configure everything.
Wi-Fi and Bluetooth Chipsets (along with the combo variants) have firmware in ROM. The ROM firmware needs to be patched with updates and fixes. These patches and updates get loaded when the Bluetooth/Wi-Fi drivers are loaded and the RPI foundation has already taken care of it. We mention it because in some cases it would be important to update it. We won’t need to do anything in this case as the defaults are sufficient.
Raspbian already comes with Bluetooth packages that can be downloaded, but we will be installing BlueZ ourselves. it’s important you can install and update to the latest version, and potentially customize the build if custom features are needed. To do this, we need to download the BlueZ distribution and install dependencies. Download BlueZ source code as shown below. note that we are using BlueZ 5.50 which is currently the latest version.
cd ~
wget http://www.kernel.org/pub/linux/bluetooth/bluez-5.50.tar.xz
tar xvf bluez-5.50.tar.xz
The commands above download the BlueZ source and extract it, and in this case we will use BlueZ 5.50. We will be compiling BlueZ on the Raspberry Pi itself, because it is powerful enough to do so and because setting up a cross-compile system is more work and unnecessary. To compile on the RPI we need to install dependencies as follows:
sudo apt-get update
sudo apt-get install -y libusb-dev libreadline-dev libglib2.0-dev libudev-dev libdbus-1-dev libical-dev
With all the dependencies installed, we will configure, make and install BlueZ:
cd bluez-5.50
./configure --enable-library
Configure is a utility that verifies all the build dependencies are present and creates anything that is needed for the build. If there are any specific errors, check the messages from configure to see if any dependency is missing. Since we already installed everything, there should not be an issue.
Now, compile Bluez by executing make:
make -j4This build will take some time, but using 4 cores it will speed it up (RPI may get hot during that time).
Finally, we need to install it in the system. the following command will make it so that calling BlueZ utilities will be the version we compiled, not any older version that was already present:
sudo make installNow that BlueZ is installed, let’s confirm the version is correct:
pi@raspberrypi:~/bluez-5.50 $ btmon -v
5.50
Which confirms the version installed is the one we compiled.
BlueZ Basics
It will be useful for you to know about basic commands and how BlueZ works. First of all, BlueZ contains a collection of utilities which we will use to connect and control devices. Here’s a list of the most common utilities:
| Utility | Function |
|---|---|
| hciconfig | Configures the HCI interface to the radio |
| hcitool | HCI Swiss Knife |
| gatttool | Connect to devices and control GATT |
pi@raspberrypi:~/bluez-5.50/tools $ hciconfig
hci0: Type: Primary Bus: UART
    BD Address: B8:27:EB:AF:2C:B0 ACL MTU: 1021:8 SCO MTU: 64:1
    UP RUNNING
    RX bytes:766 acl:0 sco:0 events:49 errors:0
    TX bytes:2504 acl:0 sco:0 commands:49 errors:0
The Bluetooth capability is provided by from the BT adapter by means of an interface, and the hciconfig utility is now telling us that our interface is hci0. We will be using that interface.
To cycle the interface, which may be sometimes needed, we can take the interface down, then up.
pi@raspberrypi:pi@raspberrypi: sudo hciconfig hci0 down
pi@raspberrypi:pi@raspberrypi: sudo hciconfig hci0 up
You may need to use the reset above if the interface isn’t behaving properly
In order to connect to BLE devices, we need to scan for the, and one way to do so is using the hcitool utility:
pi@raspberrypi:~/bluez-5.50/tools $ sudo hcitool -i hci0 lescan
LE Scan ...
4F:2A:A8:AD:7E:0B (unknown)
4F:2A:A8:AD:7E:0B (unknown)
DB:F8:F9:65:59:15 SCLE-01
DB:F8:F9:65:59:15 (unknown)
78:5D:71:CE:AF:E0 (unknown)
7D:FC:BE:D1:39:F6 FitBit
7D:FC:BE:D1:39:F6 (unknown)
F5:ED:4B:A5:08:72 (unknown)
F5:ED:4B:A5:08:72 (unknown)
DF:F7:7B:74:4D:76 (unknown)
E8:3D:EF:7A:30:FD SCLE-01
E8:3D:EF:7A:30:FD (unknown)
Above we called the hcitool with hci0 as the scan, and requested an LE Scan. This looks for all nearby devices and provides the MAC address.
Now that we have addresses of BLE devices, let’s connect to them. For this we will use the gatttool utility since we will manipulate the GATT of a BLE device too. hcitool is basically a swiss knife for all HCI commands, both Classic Bluetooth and BLE, but it will not by itself manipulate the GATT tool.
gatttool can operate in two modes: interactive and non interactive. In interactive mode, the console provides an interface that enables you to issue commands and interact with the device. You will need to quit to return to the terminal.
When executing commands it is important to avoid letting the command terminate on its own. Stopping commands with CTRL+C may result in the hci interface etering an unknown state. In that case, turning the interface off then on will help
sudo gatttool -i hci0 -b DB:F8:F9:65:59:15 -I -t randomThe code above is standard, but it’s important to note the use of the -t parameter which specifies whether the address used by the device is random or public. Public addresses are those that use assigned IEEE MAC addresses. Random are addresses where the MAC is assigned randomly, as is in most cases in BLE devices.
If you’re having trouble connecting to a device, use public or random as needed to connect.
Reading / Writing BLE Characteristics
One of the most important tasks is to read and write to characteristics. Using the interactive gatttool we can interact with the device’s GATT Database (which Peripherals have)
Some of the BlueZ gatttool commands are:
NAME
gatttool - tool for Bluetooth Low Energy device

SYNOPSIS
gatttool

DESCRIPTION
gatttool is tool that can be used to manipulate these attributes with a Bluetooth Low Energy device.

USAGE

gatttool [OPTION...]

Help Options:
-h, --help Show help options
-h, --help Show help options
--help-all Show all help options
--help-gatt Show all GATT commands
--help-params Show all Primary Services/Characteristics arguments
--help-char-read-write Show all Characteristics Value/Descriptor Read/Write arguments

Application Options:
--i, ---adapter=hciX Specify local adapter interface
--b, ---device=MAC Specify remote Bluetooth address
--t, ---addr-type=[public | random] Set LE address type. Default: public
--m, ---mtu=MTU Specify the MTU size
--p, ---psm=PSM Specify the PSM for GATT/ATT over BR/EDR
--l, ---sec-level=[low | medium | high] Set security level. Default: low
--I, ---interactive Use interactive mode[DB:F8:F9:65:59:15][LE]> char-read-uuid f000aa11-0451-4000-b000-000000000000
handle: 0x0030 value: 00 00 00
[DB:F8:F9:65:59:15][LE]> char-write-cmd 34 07
[DB:F8:F9:65:59:15][LE]> char-read-hnd 30
handle: 0x0030 value: 00 f0 02Enabling and Receiving Notifications
Getting notifications from BLE devices is another mechanism for getting data from BLE devices in a low power way. A device can send a notification when it has new information to send, such as new data or an alert.
To enable notifications, we need to write to the CCCD (Client Configuration characteristic descriptor) with the right flags:
[DB:F8:F9:65:59:15][LE]> char-write-cmd 34 07Using the Raspberry Pi as a Gateway
At the beginning of this article we mentioned some of the performance issues the Raspberry Pi has, and you may have seen that the range can be somewhat limited, depending on the device being used. That’s not everything to consider.
If you are looking to use the Raspberry Pi in any kind of deployment, look to do the following to improve your results:
- Use Ethernet or 5GHz band if possible to avoid interference in the 2.4GHz band
- For 2.4GHz Wi-Fi, reduce the amount of data being sent reduce interference
References
- Raspberry Pi Foundation
- Bluetooth Core Specification
- BlueZ – Bluetooth Protocol Stack
- Raspberry Pi 5
Photos courtesy of the Raspberry Pi Foundation. Bluetooth SIG Trademark is used by Argenox under license.